Showing posts with label Baby. Show all posts

Tuesday, December 27, 2011

Tuesday's Treasure: Girl's Skirt

Girls Skirt Tutorial

Materials:
*Fabric
*Sewing items
*Sewing macine
*Elastic
*Clothes pin

_Cut out fabric pieces. I did two different fabrics to make mine. The top piece was about 15 1/2" W x 7" L. The bottom piece was same width and about 5" long. I just eyed the measurements by holding the pieces up to my 18 month old. 
_Sew the two pieces together. If you have a Serger, serge the edges first. Or you can use a zig zag stitch on your sewing machine on the edge to help the fraying. 
_Iron seam flat. 

_Iron front-side of skirt flat too. 

_Sew the hem. 

_Now sew down the side seam. 
_Iron seam flat.

_Almost finished! Folding the top of the skirt down to the width of your elastic, iron flat. 
_Sew close to the edge of that fold (raw edge) all the way around, leaving about 1" open. 
_Measure elastic to child's waist & pin one end with a clothes pin. 

_Push elastic through hole left open, keeping a hand on the end of the elastic [you don't want the end to get lost in the skirt :) ]. 
_Once all the way through, sew ends of elastic together; sew 1" opening shut. 


Tuesday, December 6, 2011

Tuesday's Trash to Treasure: Security Blanket

Security Blanket Tutorial
Reuse: Fabric

Materials:
*Fabric
*Sewing machine & supplies
*Iron

_Cut two pieces of fabric to the same length. I did mine about 13" wide & tall (square).
_Pin the two right sides together.

_Cut four pieces to make the tabs. I forget how long I did mine, but they don't have to be very long. 
_Pin right sides together and sew around edges, leaving a small hole to turn inside out. I did not sew the hole shut; I put that end to be sewn on the inside of the blanket. 

_Figure out where you want the tabs, then pin the inside of the square, leaving about 1/4" hanging out. 

_Sew around edges at 5/8", leaving a hole open to pull blanket inside out. Hand sew the hole shut.
_Iron edges flat. You can sew around the edge at 1/4" if you'd like, I did not. 


Tuesday, November 22, 2011

Tuesday's Trash to Treasure: [easy] Quilt

Quilt Tutorial
Reuse: Fabric Scraps

Materials:
*Sewing Machine
*Fabric
*Sewing items (pins, scissors, etc)
*Quilters Batting
*Patience :)

Gather & cut your fabric for the front side, I cut mine in 5" squares.


Layout the pieces to how you want them to lay. Sew them together, starting with each row. I used roughly 1/4" seam allowance. Press the seams flat.


Once you have your rows sewn, sew those together to make one large square. One very HELPFUL TIP, start in the center and measure the two vertical seams together, then pin. Pin out the rest of that row the same. If the top seams don't match up, you'll see that in your finished product :(  Press the seams flat.


Now you will need to make a border, I found a tutorial on how to make mine here. My border is 4" wide.

Once your borders are sewn on, press the seams flat. You will now measure & cut out the batting and back pieces. 
This next step I completely forgot to do, but you should do it :) Now you need to baste your quilt. Find the tutorial here.

You can machine quilt your quilt now, or if you'd like, after the binding. I did my binding first, here's how it turned out.

NOW it's time do make this blanket look like a quilt! I did a simple "x" pattern on just the middle section. 


Tuesday, November 15, 2011

Car Seat Covers

I just came across this site & LOVE their products! I love how they even have car seat covers for TODDLERS!


Check out their website


Tuesday, October 11, 2011

Tuesday's Trash to Treasure: On the Go Activity Book

I found this on Pinterest, and loved it, so today's tutorial comes from At Second Street.

Felt Activity Book Tutorial
Reuse: Felt

Materials:
*10 sheets of felt:
 -4 of same color for main pages of book
 -2 of same color for embellishments
 -2 of same color for embellishments
 -1 flesh colored piece
 -1 hair colored piece
*Flexible sew-on Velcro tape
*8 pack of crayons
*Small notepad

I am tweaking my book a little from the original, just because my daughter is too young for tic-tac-toe. So my book will have the coloring page, ABC & 123 page & the doll page.

_First cut out eight(8) 5x7 pages in the same color for the main pages. 

**TIP: cut out two pieces of each cut-out below to make felt more durable, then sew together**
Construct pages 1 & 2: Doll dress up
_Draw/trace a doll onto a paper; trace the hair onto a separate page.
_Cut doll & accessories out of felt; sew onto one of the 5x7 sheets.

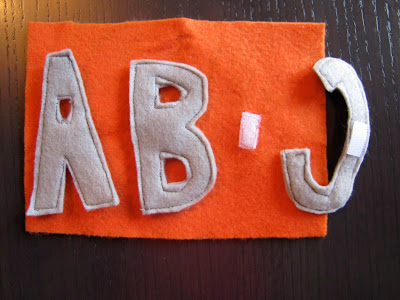
Construct pages 3 & 4: ABCs & 123s
_Draw/trace an "A", "B", & "C" onto two of the pieces of felt & cut. Sew these two pieces together. We will attached these with the Velcro, so cut little squares out for each letter & number. Sew one side to a 5x7 sheet, then adhere letter.


_Draw/trace a "1", "2", & "3" onto one of the pieces of felt. 
_Sew 3 squares of Velcro onto each side of the pages.

Construct pages 5 & 6: Coloring
_Sew two 1x5 strips of felt together. Then sew it into place by zig zagging up and down near the edges of the strip. 

_Cut two circles, and sew them to cover the zig zag lines. 

_Sew two strips of felt, 2 1/2 x 7 together, I used a 1/4" seam at the top & bottom only. 
_Sew this to a 5x7 sheet, down the middle. Then sew lines each direction every 3/4".

[oops, mine came out crooked :) ]

_This picture shows the back cover & the crayon page sewed together already, but to make the strap: Cut two 1 1/2"x5" strips, sew together. Round one edge, then attach a side of Velcro (if you are going to sew it, I'd sew it before sewing the two strips together). 
_Sew strip onto back cover at about 1/4". 


Front cover
_Sew a round piece about 1/4" from edge of the front cover. 
_Sew a piece of Velcro on top of the dot. 
_You can now sew your pages together. I sewed the front cover to the doll page, Doll accessory page to the ABC page, 123 page to the book page, and the crayon page to the back cover. You should end up with four pages. DO NOT SEW THE INNER SIDE OF THE PAGE!


Binding:
_Cut two piece of 2"x7" strips. 
_Tuck them into both sides of the front & back cover pages & sew down the inner side of the page. Leave 1/2" in between. Do the same for the last two pages. 

_Finally, lay the inner pages onto of the cover pages & sew down the middle of the binding. 


You can make a binding cover if you wish, I chose not to :)


Related Posts Plugin for WordPress, Blogger...